Official Luthiers Forum! http://www-.luthiersforum.com/forum/ |
|
Dish Sander Progress (pics) http://www-.luthiersforum.com/forum/viewtopic.php?f=10102&t=9836 |
Page 1 of 1 |
Author: | Brad Way [ Thu Dec 14, 2006 1:20 pm ] |
Post subject: | |
Well after weeks of messing around I finally turning the corner on my motorized dish sander project. It was great to see past threads from Tim McKnight, Shane Neifer, Mario, and others so basically this is my version of the motorized dish sander. I am also planning a dish router jig (similar to Shane's) that will allow me to route radius dishes while rotating on the sander. Here are the details: I will post more when it is complete but couldn't wait to share the progress. ![]() 
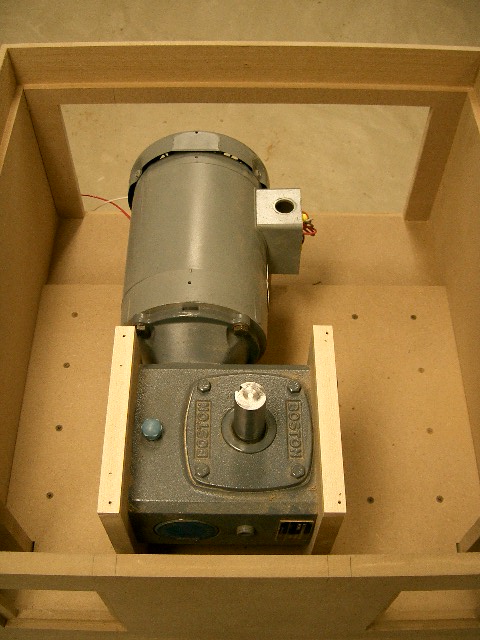
1 hp motor with 20:1 gear reducer..final mechanical speed of 87 RPM ![]() Top Mounted ![]() 
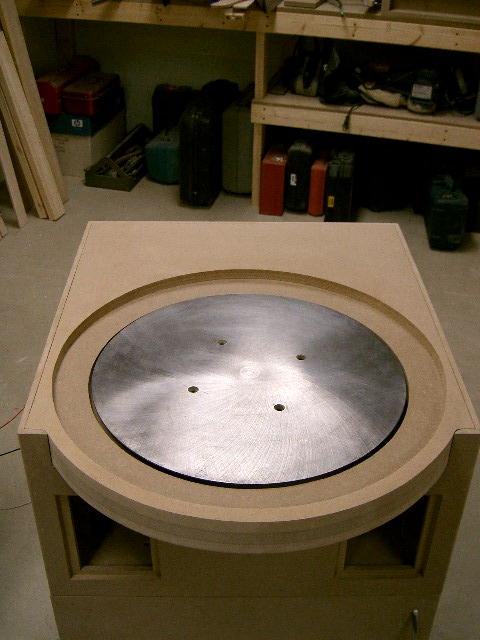
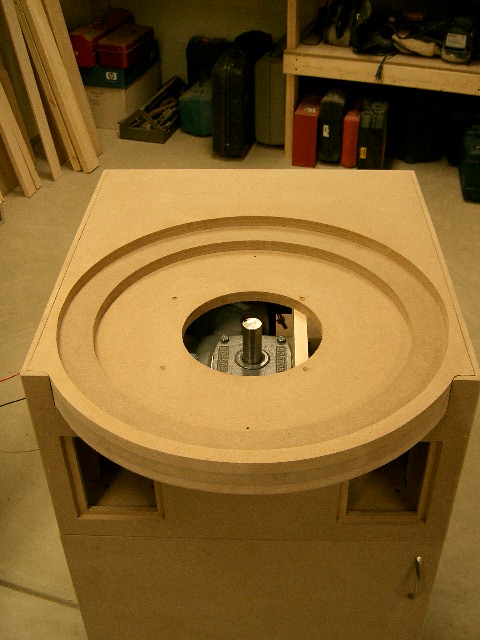
Found a great ground plate with shaft adaptor at a local used equipment warehouse. Will need to add a few holes for driving a dish. ![]() 
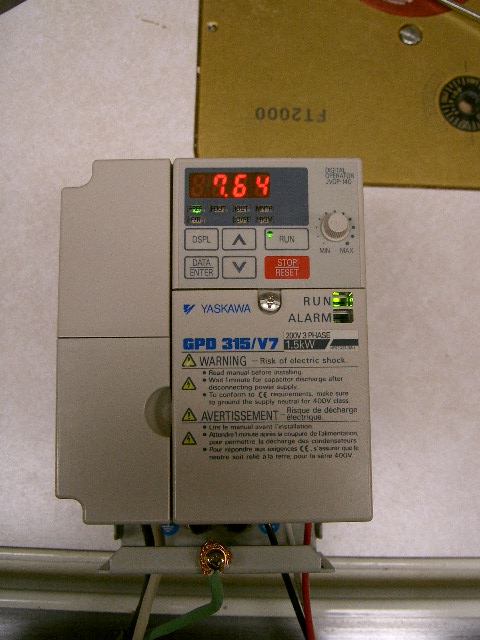
Full speed control via a Variable Frequency Drive. Allow electronic speed control from 1 to 125+ RPM without torque loss. ($90 Ebay) ![]() 
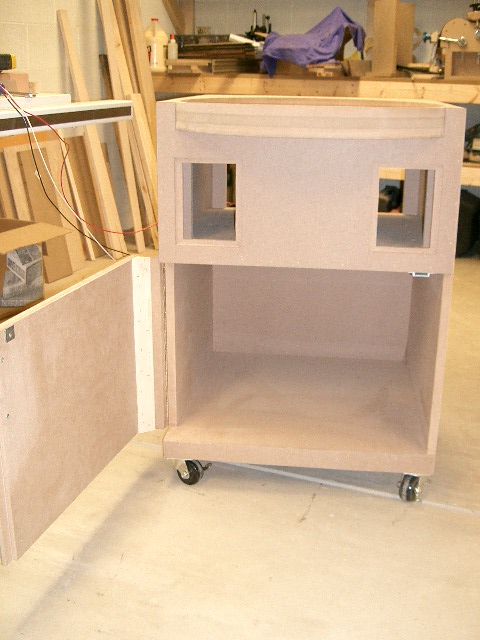
Room for dish storage (great idea Tim McKnight) Tomorrow I am hoping to finish the electrical and put some finish touches on it. All in all I am really pleased with the performance and considering everything was under $200 it seemed resonable. Thanks for looking! |
Author: | JJ Donohue [ Thu Dec 14, 2006 1:31 pm ] |
Post subject: | |
Nice design and excellent execution, Brad! |
Author: | John How [ Thu Dec 14, 2006 1:45 pm ] |
Post subject: | |
Very nice looking machine. Ain't ebay wonderful!!! |
Author: | Brad Way [ Thu Dec 14, 2006 1:50 pm ] |
Post subject: | |
You aren't kidding about Ebay. The right angle gearbox was $30 and was brand new. Hard to buy pulleys, shafts, & belts for that kind of money. |
Author: | Shane Neifer [ Thu Dec 14, 2006 2:21 pm ] |
Post subject: | |
Hey Brad, That looks FABULOUS!!! Certainly a few steps above mine. I like that plate as the bearing I have is not as smooth as I would like. Tim used only two holes to drive his dish, I have four and would only use two knowing what I know now. It looks to me like you could just add dowel stubs to the bottom of your dish and have them drop into holes in you plate. I think that is waht I would consider. Looking forward to seeing it through! Oh ya, John How's addition of stops for sanding sides was great and I have added a system like that to mine, although it is quite crude and will need refinement. Shane |
Author: | Brad Way [ Thu Dec 14, 2006 2:34 pm ] |
Post subject: | |
Shane...I like your radius routing jig that fits your sander. Would you change anything to make it better? As for John How's stops...are you refering to the treaded rods with the stops? Seems like a great idea and when I get to that point I will probably add something similar. In your opinion...since I have a steel backing plate (about 16" diameter) do you think I will still need a double thick piece of MDF (1 1/2?) for the radius dish? I was thinking I might be able to get away with 3/4" or 1" |
Author: | Shane Neifer [ Thu Dec 14, 2006 2:53 pm ] |
Post subject: | |
I like the double thickness Brad. I think the dishes are just more stable that way and that extra mass will always be your friend! To make my discs I cut two cirles out with the router, I made another jig for that. There is a 3/8 through the centre of the dishes. Then I use that hole to align the two halves with a 3/8 dowel. I glue the two halves together with eight clamps around the perimetre. Once they are dry I drill the dog holes in the bottom of the dish and then mount it on the sander. I then turn the rim sander on and sand the EDGE of the disc, while itis spinning, with my belt sander. This gets the dish round and balanced, it is very noticeable how much difference this makes. You may want to cut a notch in the tray you made just so you can do this. Once it is trued up then I mount the sled and rout. I like the sled and think it works well. I have a friend that draws the arcs for me in AutoCAD and then prints them out full size, I use those to make the sleds. My sander spins counter clockwise. I rough rout from the outside edge in and then do a fine finishing pass from the centre out. Then finish off with some 80 and then 120 grit paper, while it is spinning. I only have a hlf horse motor and it works great! Yours will be powerful enough to grind anything you like! John has said before that would like to have the power to start the machine with the sides sitting on the sander, I don't think mine has enough power to do that but yours certainly will. Also, I am referring the ready rod supports that John has. Mine is similiar. Does your plate spin nice and level...I have envy!! Great job and ask if anything else needs clarification! Shane |
Author: | Tim McKnight [ Thu Dec 14, 2006 3:10 pm ] |
Post subject: | |
OUTSTANDING Brad. I really like the VFD idea and the large plate. That will add a significant amount of stored energy via the flywheel effect. If you choose to use a two pin drive like mine I would suggest using double thickness MDF plates to give more surface are for the driving force to bear against. I like the right angle drive better than my pulley reduction too. I think your dish will have significantly more torque than mine which can be a bit anemic when it is cold ;( |
Author: | Brad Way [ Thu Dec 14, 2006 3:10 pm ] |
Post subject: | |
Shane....good ideas. Your experience certainly confirms many of the ideas I have had about making dishes. [Quote=Shane Neifer]John has said before that would like to have the power to start the machine with the sides sitting on the sander, I don't think mine has enough power to do that but yours certainly will[/QUOTE] One thing that is really nice about the VFD speed control is that is can be adjusted to accelerate or declerate at a certain rate. For example it will ramp up to full speed over 10 seconds when turned on. It also has the ability on start up to increase torque 150%. This might work well if I decide that starting the sides on the sander is the way to go. |
Author: | PaulB [ Thu Dec 14, 2006 4:27 pm ] |
Post subject: | |
Nice work. Very well thought out. Having the dish overhanging like that will be doing your back all sorts of favours too. I'm totally going to steal your ideas. ![]() |
Author: | Barry Daniels [ Fri Dec 15, 2006 2:40 am ] |
Post subject: | |
Why are you using the electronic speed control? It seems redundant when combined with the mechanical gear reducer. Wouldn't your dish rpm be really slow since it is being reduced by both? |
Author: | crazymanmichael [ Fri Dec 15, 2006 3:05 am ] |
Post subject: | |
a very elegantly designed machine which will certainly not be lacking in power. i too am curious about the decision to use the speed controller, and how they work on single phase induction motors, or is your gearmotor three phase. |
Author: | Brad Way [ Fri Dec 15, 2006 4:17 am ] |
Post subject: | |
[Quote=BarryDaniels]It seems redundant when combined with the mechanical gear reducer. Wouldn't your dish rpm be really slow since it is being reduced by both?[/QUOTE] Good question. Locally we have a equipment dealer that sells lots of surplus 3 phase motors. Originally the speed controller was a way least expensive way to invert 1 phase to 3 phase. There is some other nice benifits to the speed controller. The gearbox reduces the speed to 87 RPM but with the VFD I can increase the speed over the base motor speed. This should allow me to get it back to 100+ RPM or whatever seems to work best. From what I could tell there seemed to be various opinions on what is the right speed so this will make it easy. |
Author: | Scott McKee [ Fri Dec 15, 2006 5:24 am ] |
Post subject: | |
Brad, I love the idea of using a gear reducer. Having just finished profiling 5 instruments spinning the dishes by hand and wearing out a pair of leather gloves in the process, I've promised myself that I will motorize this step in the near future. Can you elaborate a bit on how the reducer attaches to the motor? Is the housing motor specific or generic? I understand that the male and female shaft sizes will need to match. Thanks |
Author: | Brad Way [ Fri Dec 15, 2006 5:49 am ] |
Post subject: | |
[Quote=Scott McKee]Can you elaborate a bit on how the reducer attaches to the motor? Is the housing motor specific or generic?[/QUOTE] The reducer has a c-face motor mount and I used a 56 fame motor (56C). Basically the motor and gearbox match. The motor connects to the reducer with 4 bolts. The motor shaft fits in the female reducer shaft. Since I purchased the gearbox on Ebay on and the motor locally I just made sure the bolt circle was the same, the shaft was the right diameter and length, and the keyway was right. The two bolted together in a few minutes of work. |
Author: | Serge Poirier [ Sat Dec 16, 2006 9:05 am ] |
Post subject: | |
Congrats Brad, one neat machine, i look forward to build me one too in the future! |
Author: | Don Williams [ Sat Dec 16, 2006 9:22 am ] |
Post subject: | |
Wow....that is really fantastic! I love the attention to details even with the cabinet. Very, very cool. |
Author: | Roy O [ Mon Dec 18, 2006 4:26 am ] |
Post subject: | |
Impressive. That's going to be a beautiful sander once it's finished. |
Author: | Tom Morici [ Tue Dec 19, 2006 3:35 pm ] |
Post subject: | |
Wow!! thats nice. Your sander looks first class. If I had the room, Id copy it. Tom |
Author: | robertD [ Thu Dec 28, 2006 8:13 am ] |
Post subject: | |
Hey Brad, That’s a great looking tool you got there! And, I gotta tell you, I have a real appreciation for nice tools. ![]() What do you use a Dish Sander for? Robert |
Author: | tony [ Thu Dec 28, 2006 8:30 am ] |
Post subject: | |
Brad - be aware that motors not design to be driven with a VFD can sometimes fail because of the way the VFD drive manipulates frequency by switching power off/on to create the pulse. Should you expect a failure? No more than you will probably use it - I doubt it. I only mention this because if you do have to replace it one day, you'll know that they make motors that are rated for use with a VFD drive. Good vs better. Really nice design and execution by the way. Well done! Thou shalt not covet. |
Author: | L. Presnall [ Thu Dec 28, 2006 9:05 am ] |
Post subject: | |
Brad, that's a thing of BEAUTY! What nice work! You could sell those! Saaaayyyy..... ![]() |
Author: | crazymanmichael [ Thu Dec 28, 2006 9:08 am ] |
Post subject: | |
robert, among other things radius dishes, with sandpaper attached, are used to profile the braces and the rib set to the desired top or back radius. motorizing the dish makes the process of sanding the rmbset less labour intensive but also raises the risks of making an inadvertant error, simply because things happen so much faster. |
Page 1 of 1 | All times are UTC - 5 hours |
Powered by phpBB® Forum Software © phpBB Group http://www.phpbb.com/ |